Hi Friends,
Some way or other we overcome with multiple issues, where we are in need to know if by any means rpd password is set wrong in OBIEE 11g.
For 10g it was easy and we can easily bypass security by modifying NQSConfig.INI file. But this is not applicable for OBIEE 11g.
However we had the solution till OBIEE version 11.1.1.7 to get rep password through process as below: ( Only applicable till versions 11.1.1.7)
Pre-Requisite - You must have Admin Rights to access weblogic & OS to find it. You can not bypass security. :)
Step-1 Navigate to your ORACLE_HOME, then go to common/bin path under ORACLE_HOME, where you can get wlst.sh / wlst.cmd command to execute WLST.
wls:/offline>
(Note - You may ignore warning for insecure protocol)
Step-2 - Connect online with connect command with your weblogic admin credentials.
Format -
connect(“<weblogic_AdminUser>”,”<weblogic_AdminUser_Password>”,”<Adminserver_Hostname>:<Admin_Portno>”)
eg.
connect("weblogic","weblogic123","t3://HOST_NAME:7001")
You are now connected to wlst online :
wls:/bifoundation_domain/serverConfig>
Step-3 Execute listCred command online
Format -
wls:/bifoundation_domain/serverConfig> listCred(map="mapName", key="keyName")
wls:/bifoundation_domain/serverConfig> listCred(map="oracle.bi.enterprise", key="repository.SampleAppLiteBI0003")
But as mentioned earlier this is applicable till obiee 11.1.1.7 versions. What if we have version greater than 11.1.1.7.
While running ListCred command we get error as below:
Traceback (innermost last):
File "<console>", line 1, in ?
NameError: listCred
wls:/bifoundation_domain/serverConfig>
Reason:
Oracle has removed listCred wlst command and is no longer available
So what is the alternative ???
It is available Folkes... :)
Solution:
1) Log into to EM console, navigate to Weblogic Domain ->Domain Name ->System Mbean Browser
Under Application Defined Mbean go to com.oracle.jps ->Domain:<domain_name> -> JpsCredentialStore ->JpsCredentialStore
As shown in figure below:
2) Click Operation tab and select getPortableCredential
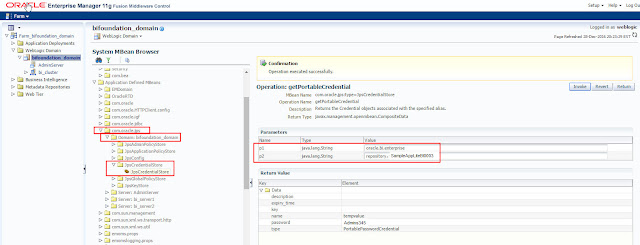
3) Enter both the parameters as shown
Enter map value in first text box & key value in second text box
4) Click on Invoke to get the password
You will get your password under Return Value Panel password field.
:)
Merry Christmas & Happy New Year to all.
:)
Some way or other we overcome with multiple issues, where we are in need to know if by any means rpd password is set wrong in OBIEE 11g.
For 10g it was easy and we can easily bypass security by modifying NQSConfig.INI file. But this is not applicable for OBIEE 11g.
However we had the solution till OBIEE version 11.1.1.7 to get rep password through process as below: ( Only applicable till versions 11.1.1.7)
Pre-Requisite - You must have Admin Rights to access weblogic & OS to find it. You can not bypass security. :)
Step-1 Navigate to your ORACLE_HOME, then go to common/bin path under ORACLE_HOME, where you can get wlst.sh / wlst.cmd command to execute WLST.
wls:/offline>
(Note - You may ignore warning for insecure protocol)
Step-2 - Connect online with connect command with your weblogic admin credentials.
Format -
connect(“<weblogic_AdminUser>”,”<weblogic_AdminUser_Password>”,”<Adminserver_Hostname>:<Admin_Portno>”)
eg.
connect("weblogic","weblogic123","t3://HOST_NAME:7001")
You are now connected to wlst online :
wls:/bifoundation_domain/serverConfig>
Step-3 Execute listCred command online
Format -
wls:/bifoundation_domain/serverConfig> listCred(map="mapName", key="keyName")
wls:/bifoundation_domain/serverConfig> listCred(map="oracle.bi.enterprise", key="repository.SampleAppLiteBI0003")
But as mentioned earlier this is applicable till obiee 11.1.1.7 versions. What if we have version greater than 11.1.1.7.
While running ListCred command we get error as below:
Traceback (innermost last):
File "<console>", line 1, in ?
NameError: listCred
wls:/bifoundation_domain/serverConfig>
Reason:
Oracle has removed listCred wlst command and is no longer available
So what is the alternative ???
It is available Folkes... :)
Solution:
1) Log into to EM console, navigate to Weblogic Domain ->Domain Name ->System Mbean Browser
Under Application Defined Mbean go to com.oracle.jps ->Domain:<domain_name> -> JpsCredentialStore ->JpsCredentialStore
As shown in figure below:
2) Click Operation tab and select getPortableCredential

3) Enter both the parameters as shown
Enter map value in first text box & key value in second text box
4) Click on Invoke to get the password
You will get your password under Return Value Panel password field.
:)
Merry Christmas & Happy New Year to all.
:)


